

Diamond Color Grading: 6 Simple Keys to Understanding D-Z
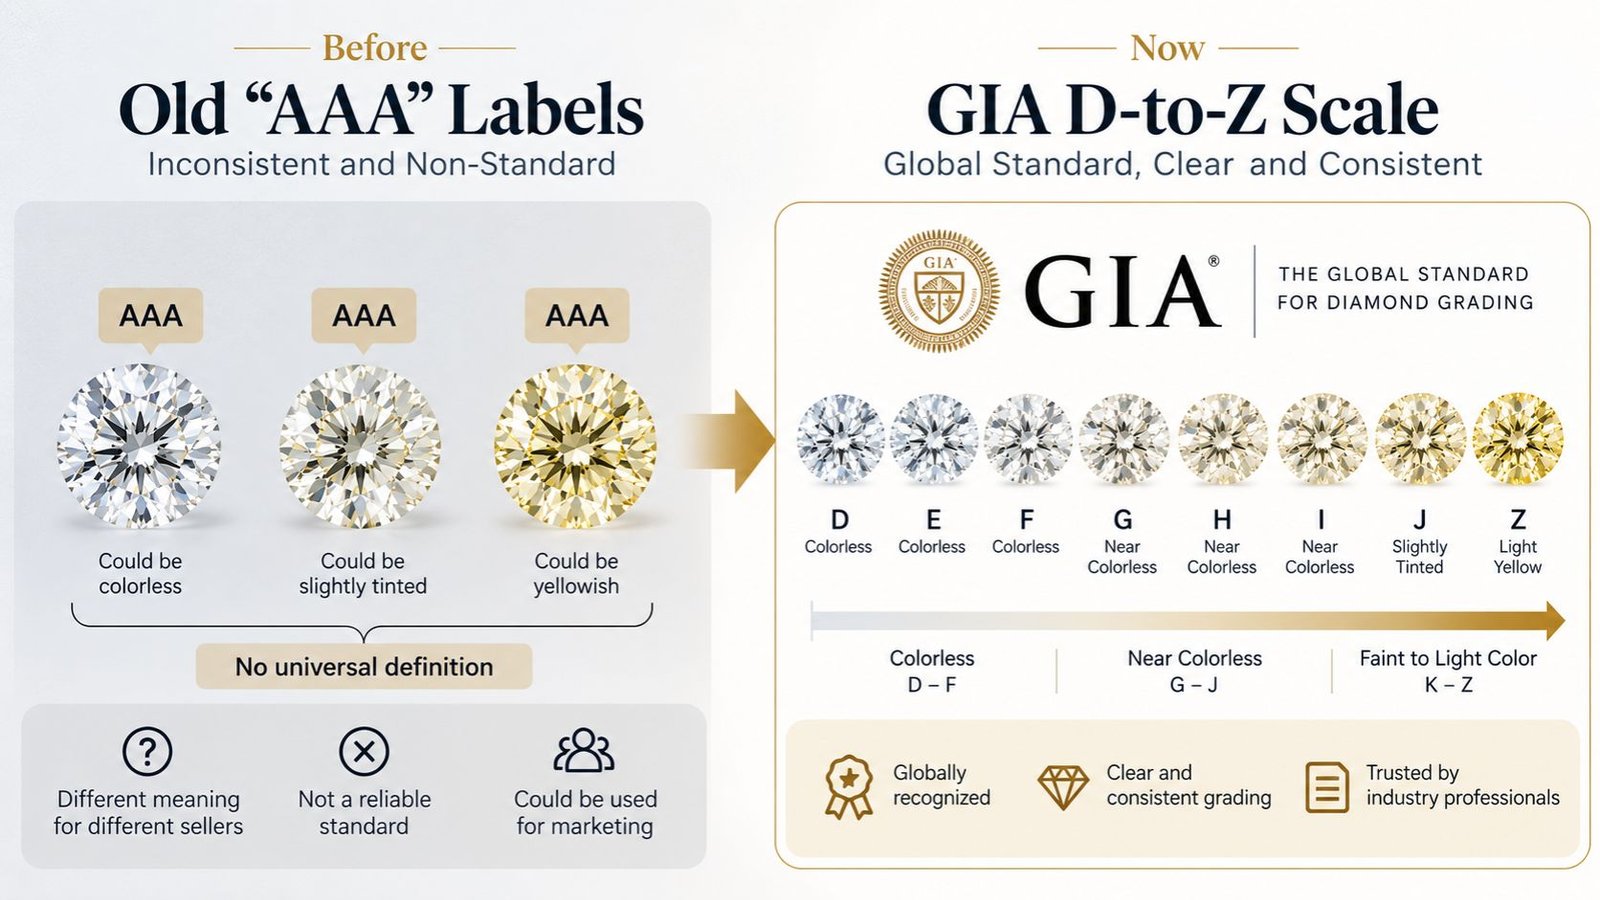
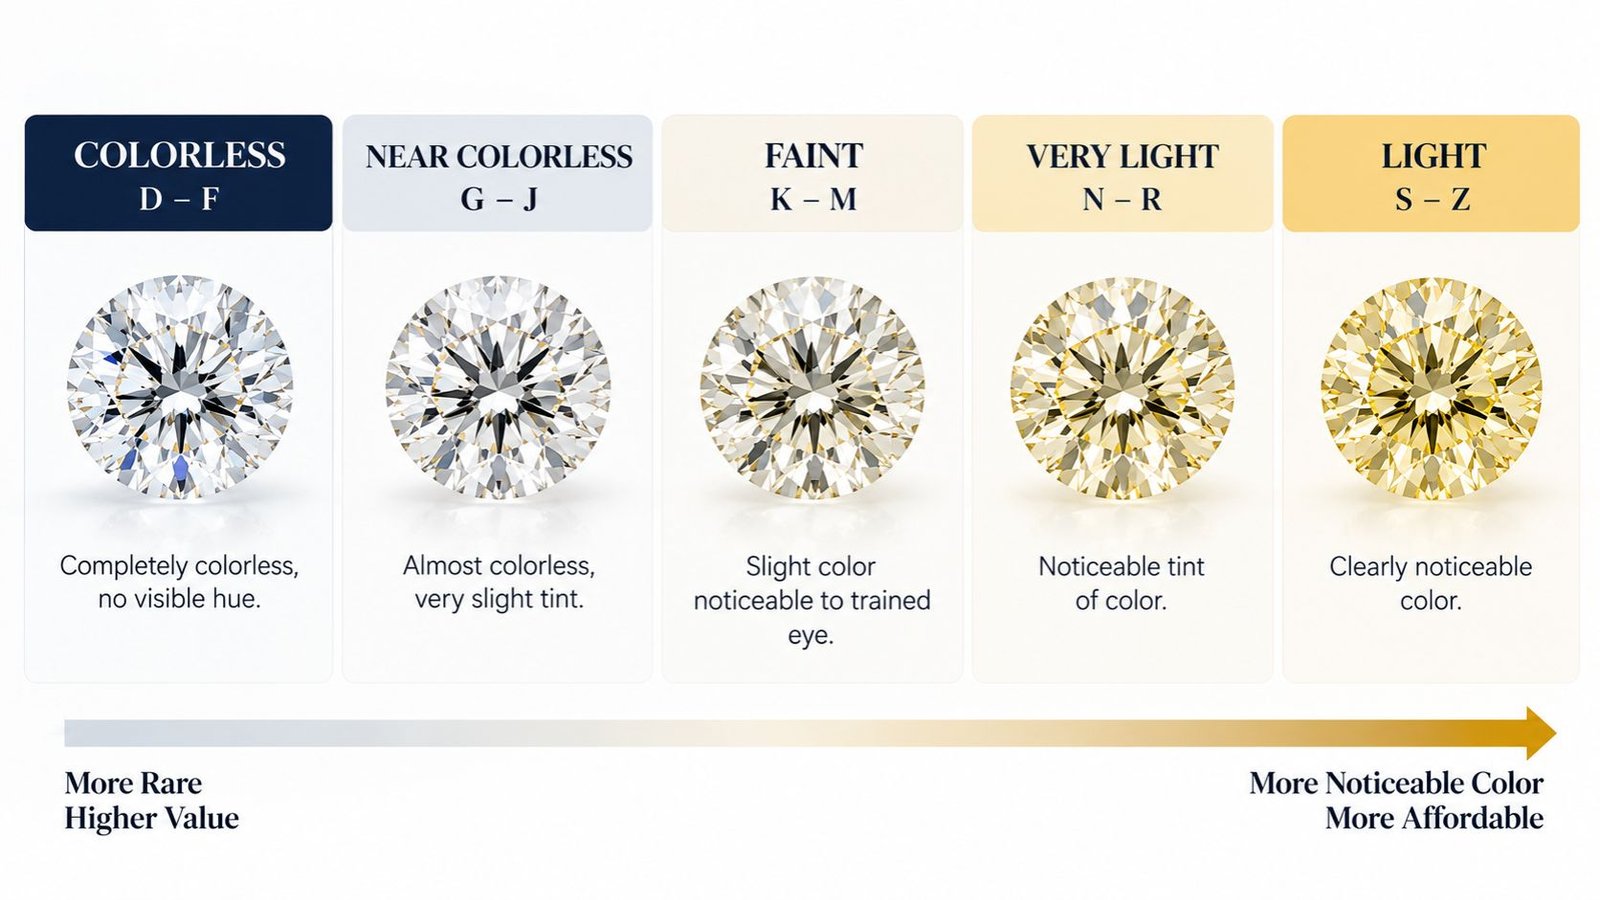
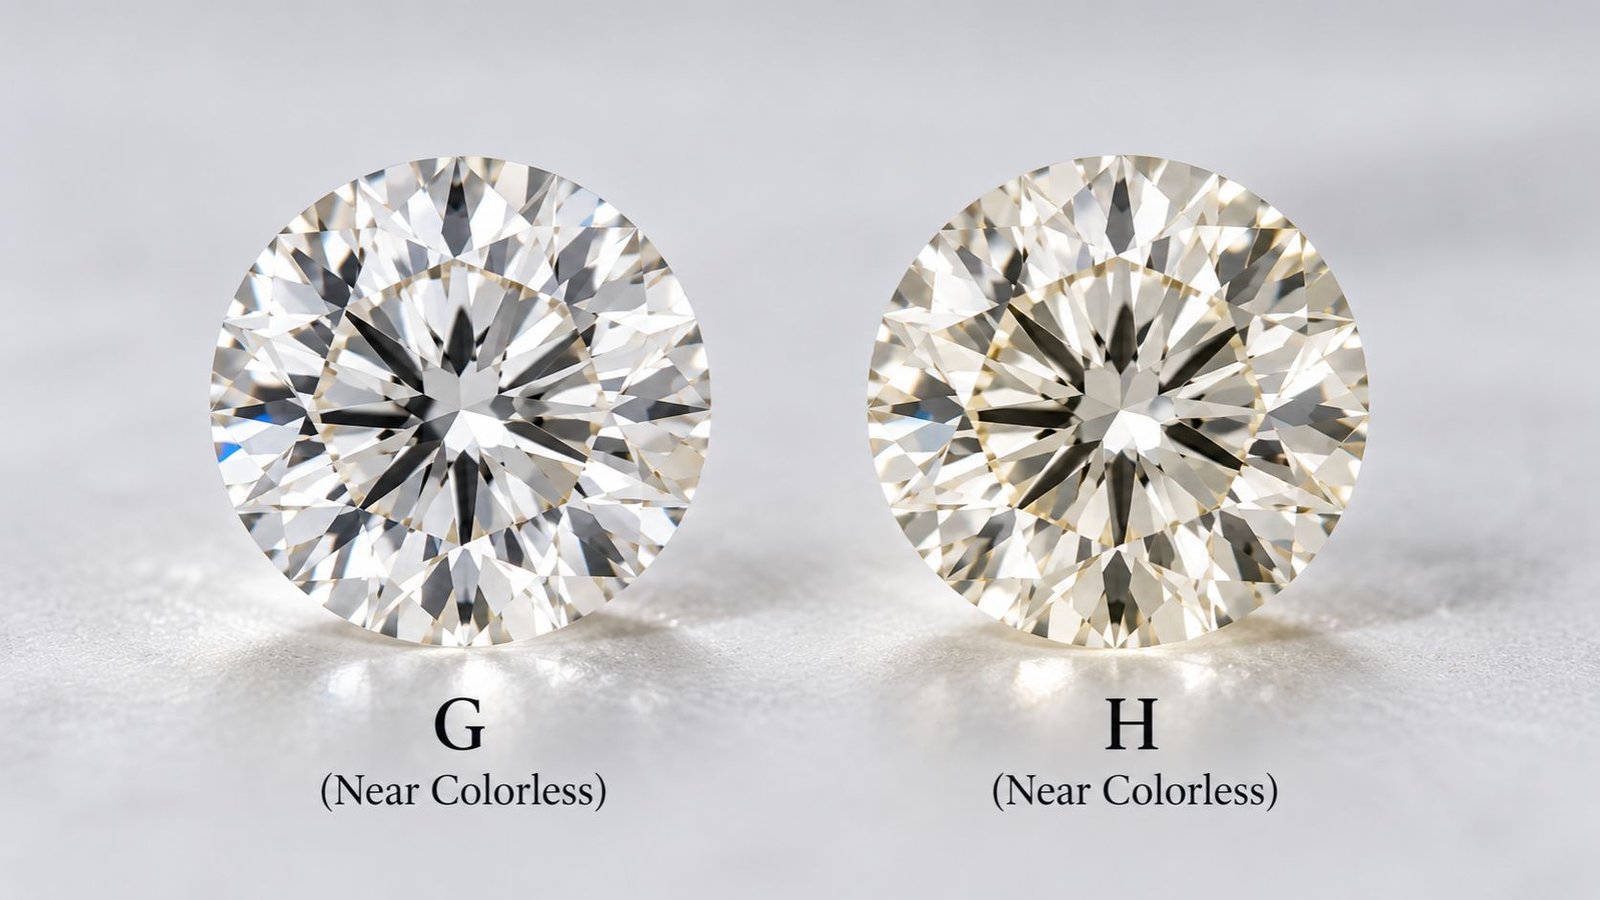
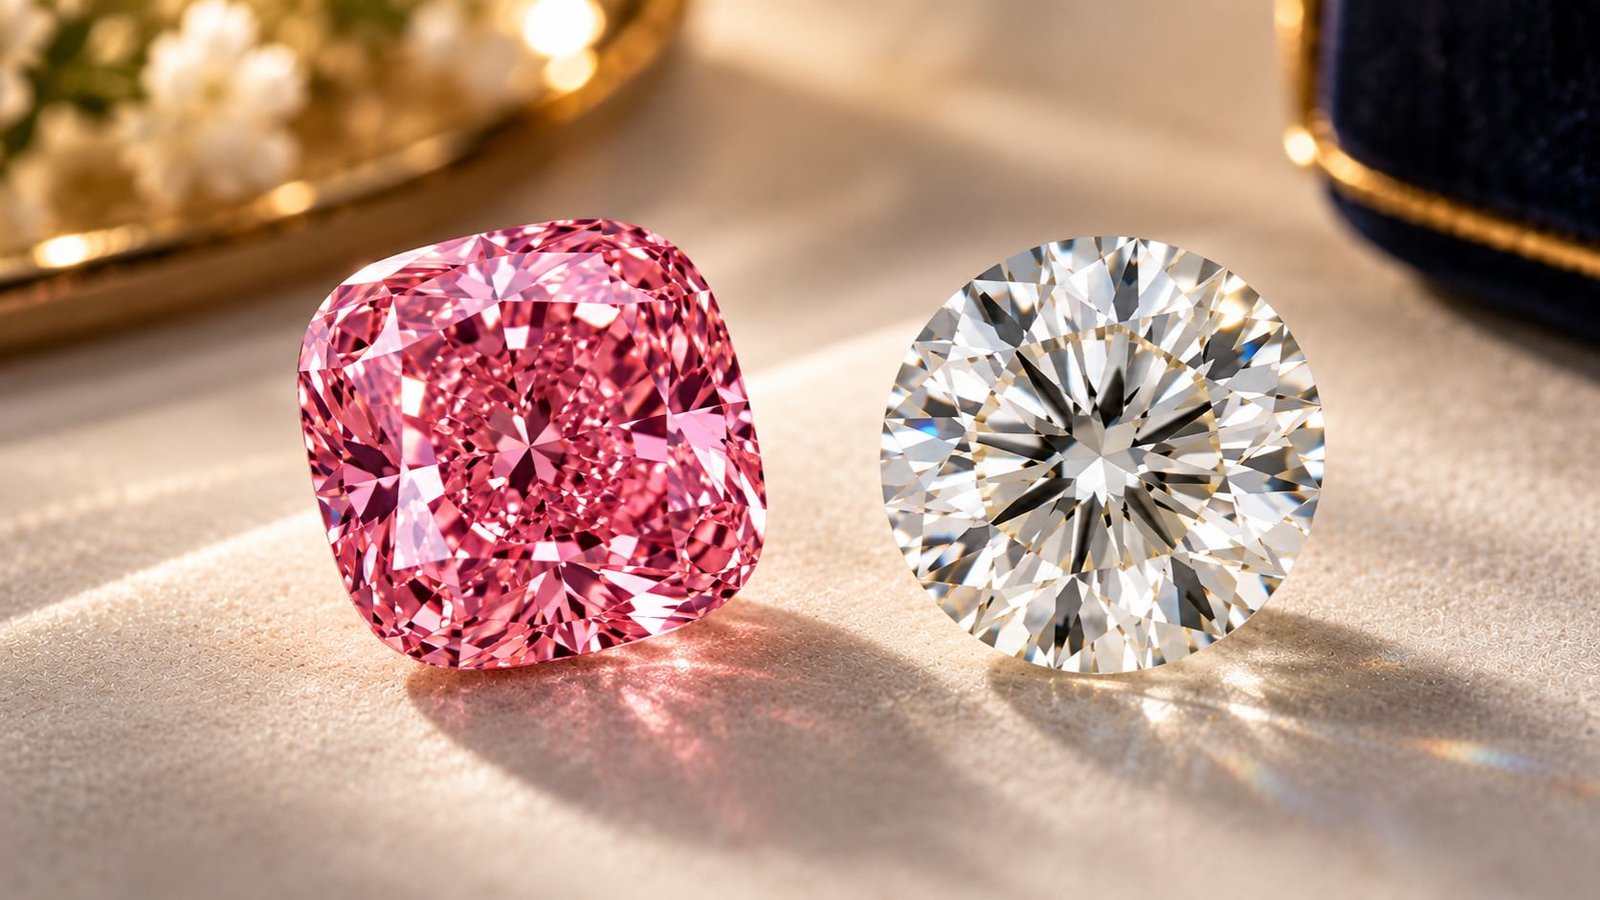
Pull up almost any diamond listing online, and somewhere in the specifications sits a single letter — D, G, J, maybe K — sitting quietly between the carat weight and the clarity grade, offering no obvious explanation of what it actually means or why it matters. For a system meant to communicate something as visually important as a diamond’s colour, the letter-based scale itself can feel genuinely cryptic to anyone encountering it for the first time. Diamond color grading is actually a remarkably logical, carefully standardised system once its underlying logic becomes clear — it simply requires a bit of context that rarely gets explained in a genuinely accessible way. Understanding how this scale actually works, what the letters really represent, and which distinctions genuinely matter for a buyer’s actual purchasing decision turns a confusing specification into one of the most useful pieces of information available when evaluating a diamond. This guide walks through six simple keys to understanding diamond color grading, breaking down the D-to-Z scale in genuinely accessible terms and explaining what these grades actually mean for anyone trying to make an informed purchasing decision. One of the most common points of confusion involves a genuinely reasonable question: why does diamond color grading start at D rather than A? The answer traces back to the scale’s actual history. Before GIA introduced its now-standard D-to-Z system in the 1950s, different sellers used a chaotic mix of inconsistent, loosely defined grading terms — “A,” “AA,” and “AAA” among them — that carried no standardised, universally agreed-upon meaning from one seller to the next. A stone graded “AAA” by one dealer might bear little resemblance to a stone graded “AAA” by another, making genuine comparison across sellers essentially impossible. GIA deliberately started its new, standardised scale at D specifically to create clear separation from these older, inconsistent systems, signalling unambiguously that this represented an entirely new, rigorously defined grading framework rather than simply another variation on the same confusing terminology already in use. This deliberate starting point has remained in place ever since, and understanding this history immediately clarifies why the scale begins where it does rather than following the more intuitive A-B-C pattern a newcomer might initially expect. Diamond color grading follows a genuinely rigorous, controlled process designed to produce consistent, comparable results across different stones and different trained graders. A gemologist evaluates an unmounted diamond by comparing it directly against a set of pre-graded master stones, representing known, verified reference points along the scale, under carefully controlled, standardised lighting conditions specifically chosen to eliminate variables that could otherwise distort colour perception. Critically, graders typically view the stone from the side, through the pavilion, rather than face-up as the stone would normally be viewed once mounted in jewellery, since this angle reveals body colour more accurately than the face-up view, which is strongly influenced by a well-cut stone’s brilliance and light return in ways that can make colour genuinely harder to assess accurately. This careful, controlled methodology is precisely what allows diamond color grading to produce consistent, reliable results that buyers can trust and compare meaningfully across different stones and different grading sessions. While the D-to-Z scale technically spans twenty-three individual letter grades, understanding diamond color grading becomes considerably more manageable once those letters are grouped into five broader practical categories. Grades D through F represent the colourless category, the rarest and most prized tier, where stones show no detectable colour even to a trained eye under controlled conditions. Grades G through J fall into the near-colourless category, where any colour present is extremely difficult to detect without direct side-by-side comparison, making this range enormously popular for its strong balance of appearance and value. Grades K through M represent the faint colour category, where slight warmth becomes noticeable to a trained eye, particularly in larger stones, though many buyers still find stones in this range genuinely attractive, especially when set in warmer metal tones. Grades N through R fall into the very light category, with more noticeable warmth, while grades S through Z represent the light category, where yellow or brown tint becomes clearly visible even to an untrained eye in most cases. Understanding these five broader groupings makes the full twenty-three-letter scale considerably easier to navigate practically than trying to memorise each individual letter grade in isolation. A genuinely important practical insight within diamond color grading involves understanding just how subtle the difference between adjacent letter grades actually is in practice. The visual difference between, say, a G and an H grade is extremely difficult to detect without direct side-by-side comparison under controlled lighting conditions, and essentially impossible for most people to distinguish reliably once a stone is mounted in a ring and viewed under normal, everyday lighting rather than a gemologist’s controlled grading environment. This practical reality matters considerably for buyers specifically trying to make smart purchasing decisions, since paying a significant premium to move up a single letter grade within the near-colourless range often buys a difference that will be genuinely invisible in actual day-to-day wear. Understanding this dynamic helps buyers avoid overspending on marginal grade improvements that deliver little to no perceptible visual benefit, directing that budget instead toward other factors — like cut quality, discussed at length in our guide on why certification matters more than carat size — that genuinely affect a diamond’s visible beauty more noticeably. Diamond color grading does not exist in isolation from the rest of a piece’s design, and understanding how metal setting choice interacts with colour grade adds genuine practical value to this knowledge. White metal settings, including white gold and platinum, create maximum contrast against a stone, making any warmth in colour more visually apparent, which is precisely why white metal pairs best with higher colour grades specifically. Yellow gold settings, by contrast, reflect warm tones back into the stone, genuinely helping mask slight warmth in lower colour grades and making a more affordably graded stone appear notably whiter than the same stone would look in a white metal setting. This interaction, covered in more detail in our comparison of yellow gold and white gold settings, means a buyer’s optimal colour grade choice genuinely depends partly on which metal they plan to pair the stone with, rather than treating colour grade as a purely independent decision disconnected from the rest of the piece’s overall design. A genuinely common point of confusion involves assuming the D-to-Z scale simply continues past Z into increasingly saturated colour territory, eventually describing vividly coloured diamonds like fancy blues, pinks, or yellows. This is not accurate. The D-to-Z scale specifically measures the presence of yellow or brown tint within what is fundamentally intended to be a colourless stone, and Z genuinely represents the end of that particular scale rather than a transition point into a different kind of grading altogether. Fancy coloured diamonds — vividly coloured stones prized specifically for their saturated colour rather than evaluated against a colourless ideal — use an entirely separate grading system altogether, evaluating hue, tone, and saturation through different terminology entirely distinct from the D-to-Z framework. Understanding this distinction prevents genuine confusion when encountering fancy coloured diamond grading reports, which will never reference a D-to-Z letter grade at all, since they operate under a completely different evaluative framework designed specifically for intentionally, vividly coloured stones rather than the colourless-to-light-yellow spectrum the D-to-Z scale was built to measure. Bringing these six keys together into practical purchasing guidance, many buyers find genuine value concentrated specifically within the G through I range, where stones offer excellent, essentially imperceptible colour performance to the naked eye while typically carrying meaningfully lower prices than the colourless D through F category commands. Buyers planning to use white metal settings specifically may want to lean toward the higher end of this range or into the colourless category itself, while buyers planning yellow gold settings have genuine flexibility to consider slightly lower grades, given yellow gold’s natural tendency to mask warmth effectively. Ultimately, diamond color grading works best as one input within a broader, balanced purchasing decision rather than the single dominant factor driving the entire choice. Prioritising a sensible colour grade range appropriate to planned setting metal, while directing remaining budget toward cut quality and overall certification-backed value, tends to produce considerably better real-world satisfaction than chasing marginal colour grade improvements that may deliver little genuinely visible benefit once a piece is actually worn. A few persistent misconceptions tend to confuse buyers encountering diamond color grading for the first time, and addressing them directly helps avoid common purchasing mistakes. One frequent misconception assumes that a lower letter grade automatically means a visibly worse-looking stone, when in reality the practical visual difference, as discussed above, is often genuinely negligible across several adjacent grades, particularly once a stone is mounted and viewed under normal lighting rather than a gemologist’s controlled grading environment specifically designed to isolate subtle colour differences. Another common misconception treats colour grade as though it exists independently of carat size, when in practice colour tends to become more visually apparent in larger stones than in smaller ones of the same grade, since a larger surface area simply shows more of whatever body colour is present. This means a buyer selecting a larger centre stone specifically may want to prioritise a slightly higher colour grade than they would for a smaller stone, where the same grade would likely remain essentially undetectable to the naked eye regardless of setting or lighting conditions. A third misconception assumes diamond color grading reports from different laboratories are always directly comparable, when in practice grading consistency can vary somewhat between different certification bodies, with major, well-established laboratories like GIA and IGI generally considered more rigorous and consistent than smaller or less established alternatives. Buyers comparing stones across different retailers should pay attention not just to the stated colour grade itself, but specifically to which laboratory issued that grade, since this detail genuinely affects how much confidence can reasonably be placed in the stated grade matching another stone’s grade from a different source. Beyond simply trusting a stated colour grade at face value, buyers benefit from a few practical verification steps before finalising a purchase. Requesting the full certification report directly, rather than relying solely on a retailer’s product description, allows a buyer to confirm the stated colour grade against the actual issuing laboratory’s documentation, reducing the risk of relying on an inaccurate or outdated description. Viewing a stone in person under multiple lighting conditions, rather than relying solely on product photography, provides a more accurate sense of how a specific colour grade actually presents in practice, since photography lighting can sometimes flatter a stone’s apparent colour in ways that do not fully reflect its appearance under normal, everyday conditions. For buyers purchasing online without the ability to view a stone in person beforehand, requesting video footage showing the stone under neutral, realistic lighting offers a reasonable middle-ground verification step, helping confirm that a stated diamond color grading result genuinely matches what the buyer should expect to see once the piece arrives and is viewed under typical daily conditions. Diamond color grading, once its underlying logic becomes clear, transforms from a confusing single letter into genuinely useful, actionable information. The scale’s historical starting point at D, its rigorous comparison-based grading methodology, its practical grouping into five broader colour categories, the genuine subtlety between adjacent grades, its interaction with metal setting choice, and its clear separation from fancy coloured diamond grading together provide a complete, practical framework for understanding exactly what that single letter on a certification report actually means. Armed with this understanding, buyers are considerably better equipped to make genuinely informed decisions about where their diamond budget delivers the most real, visible value, rather than treating colour grade as an arbitrary or confusing specification disconnected from the actual appearance and value of the finished piece. Disclaimer: This article is intended for general informational purposes only. Specific grading practices may vary slightly between laboratories. Always refer to the official certification report from a reputable grading laboratory for accurate, stone-specific information.Key 1: Why the Scale Starts at D, Not A
Key 2: How Grading Actually Works in Practice

Key 3: The Twenty-Three Letters Group Into Five Practical Categories
Key 4: Most Buyers Genuinely Cannot See the Difference Between Adjacent Grades
Key 5: Metal Setting Choice Genuinely Interacts With Color Grade

Key 6: Fancy Colored Diamonds Use an Entirely Separate Grading System
Practical Buying Guidance Using the Color Scale
Common Misconceptions About Diamond Color Grading Worth Clearing Up
How to Verify Color Grade Accuracy Before Purchasing
The Bottom Line
>Frequently Asked Questions
>GIA deliberately started its scale at D to clearly separate it from older, inconsistent grading terms like “AAA” that different sellers used loosely before the standardized system existed.